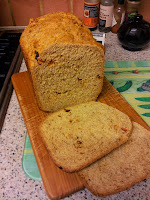
A lovely round crusty loaf, with very little work.
Just a good helping of time to let it slowly rise.
You will need a large (2.5-3 litres capacity) pyrex or glazed iron lidded casserole to bake the bread in.
- 500g Strong Plain (Bread) Flour - either all white or a 50-50 mix of white and wholemeal.
- 350g Water - this is 70% of the weight of the flour, a ratio that you will need to maintain if you scale up or down the recipe.
- 10g Salt.
- 2 tsp granulated Yeast.
- Optional: nuts, seeds, dried fruit - whatever you want to flavour your bread.
Measure all the ingredients into a large mixing bowl and mix together until all the flour is incorporated into the dough.
It may need a little extra water added, especially if you are using wholemeal flour or optional extras that will absorb moisture - add this a tablespoon or so at a time until all the flour mixes in. Better to be slightly too damp than too dry.
Loosely cover the bowl with a plastic bag and just leave it on the side in the kitchen to slowly ferment for at least 12 hours.
When the rising time is up:
Wet your hands and gently slide your fingers down the side of the dough in the bowl and lift and fold it towards the centre of the bowl. Repeat another 3 or 4 folds, working round the side of the bowl. This will knock back the dough slightly, and gather it into a soggy dome. Let it stand for a few minutes whilst you get the oven ready.
Put your casserole dish and lid into the cold oven and set it to heat up to 240C.
Once the oven is to temperature, take the hot casserole dish out and stand it on a trivet.
Sprinkle a little flour over the surface of the dough in the mixing bowl.
Carefully half-roll-half-pour the dough out of the bowl into the hot casserole dish as a single 'ball' of dough. Use a spatula to help push and shape the dough as it rolls and unsticks from the sides of the bowl and finally drops into the hot cassserole dish.
If you want the loaf to spread in a controlled fashion you should slash the top, but I generally find that it rises fine unslashed as the casserole lid traps steam to keep the surface of the bread moist and flexible as it expands in the oven.
Put the lid on the casserole and pop it back into the oven. Set a timer for 20 minutes.
After 20 minutes, open the oven and remove the lid from the casserole.
Bake the unlidded bread for a further 25 minutes to crisp and brown the upper crust.
Now turn it out of the casserole onto the oven shelf and tap the bottom of the loaf. If it sounds hollow, it is done. If not, bake for a few minutes more and test again.
Once the bread is fully baked, let it cool down completely on a rack before slicing.
If you slice it too early, the bread inside will still be a bit too moist and stick to the knife.
Store cold uneaten bread in a plastic bag to delay staling.
Categories:
Bread


